 |
|
|
This document is intended to provide the CFH12K observer, the support astronomer and the observing assistant a complete overview on how to correctly and efficiently observe with the CFHT wide-field CCD camera CFH12K. It ranges from formal descriptions of each command, step-by-step description of critical procedures, to tips and tricks.
For the observers, it will be a clear description of what they will be facing when using CFH12K (this document includes text and graphics). For the support astronomers, it is a literal version of what an introduction to a visiting astronomer should be (CFH12K related topics only). For the observing assistant, it will be a reference to help the observers in the course of the observing process if support is needed.This document provides a complete overview for use of the CFH12K camera on the sky in regular observing mode. CFH12K can be controlled from a Graphical User Interface (GUI), a Command Line Interface (CLI), or from scripts (SC, any shell).
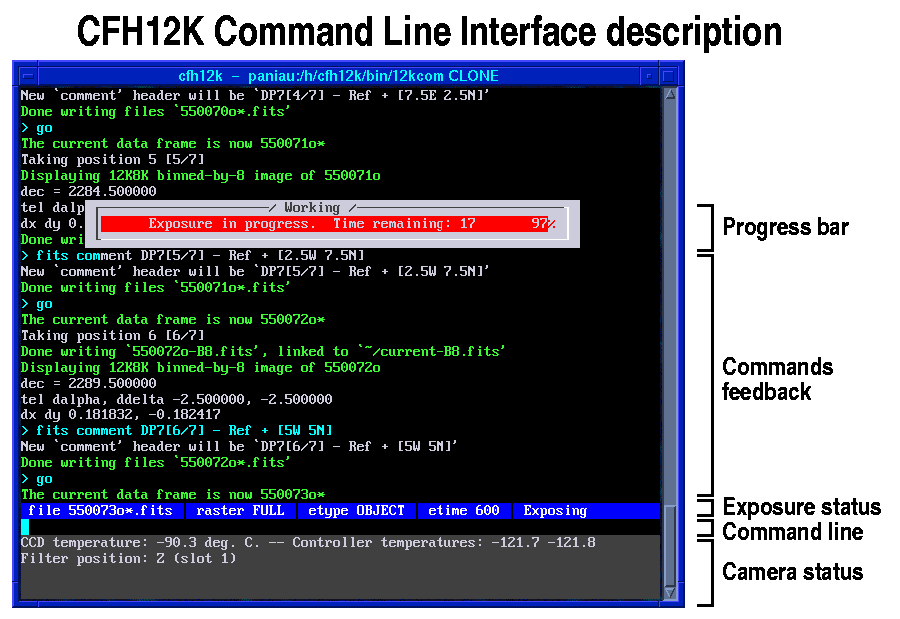
The central window of the CFH12K session is the Director window which acts both as a CLI and as a status window (this text based window usually stands in the lower right corner of the central image acquisition computer screen).
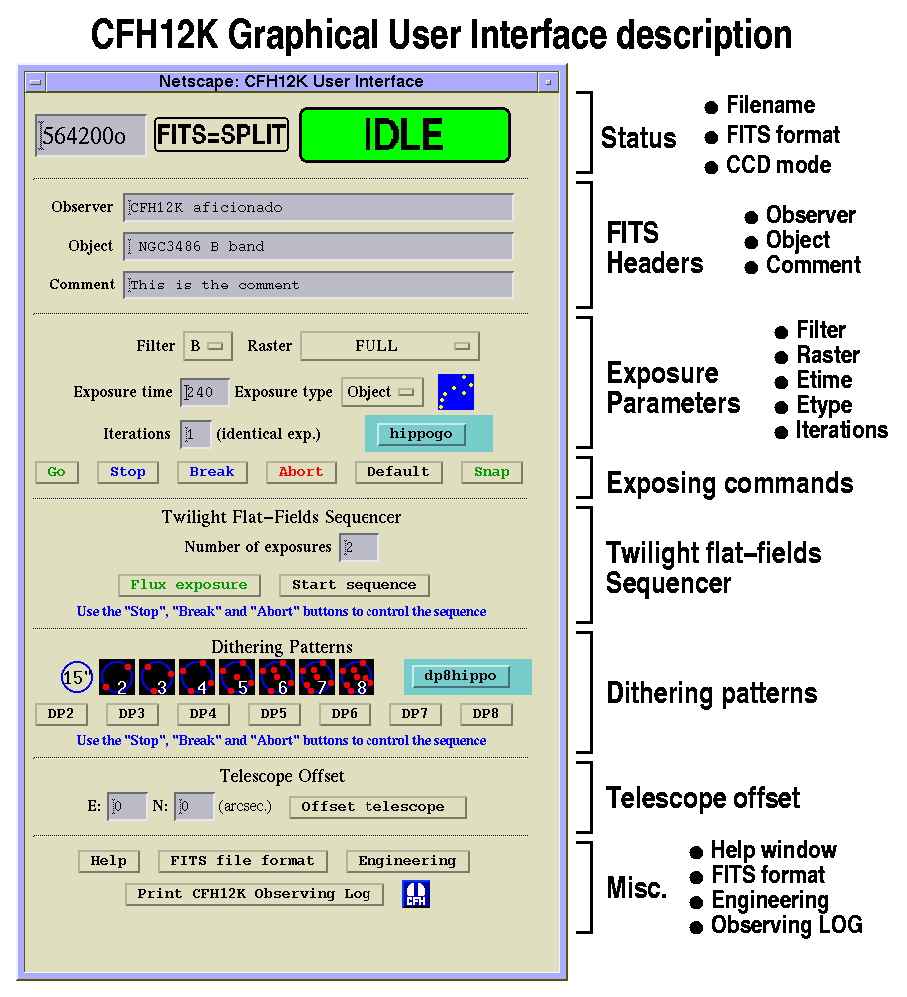
The main GUI window (CFH12K User Interface) serves as both camera status display and control interface. This GUI reproduces a reduced set of information available from the Director window; elements such as progress bars and detector temperature only appear in the Director window which serves as the main status window.
The different parameters defining a given exposure can be set up and exposures can be launched (and stopped if necessary) from either the CLI or the GUI. An interface for efficiently taking a set of twilight flat-fields with constant flux level is provided in the main GUI window. Complex interactions between the camera and the telescope (dithering patterns) are pre-programmed and available through the GUI or scripts. The focus form (CFH12K Focus Interface) launches focus sequences and can be used to control the z (focus) value of the prime focus bonnette. The file format form (CFH12K FITS File Format) allows the user to select the image FITS format for saving data to disk.
|
3: Using forms, the command line interface and scripts
Any information relative to the session will appear in the Director window. Error messages will show up in red, warning messages in yellow and successful return message in green. A CLI command is simply entered in the Director window by typing the correct syntax and then on the Enter key (including the stop, abort and break commands). Several commands can be stacked up in the input pile and will be processed sequentially (but certain special commands like stop, abort and break will be immediately processed). Commands appear on the screen as they are processed. A pile of commands gets created when entering several commands in a row before waiting completion of each of them (either from the CLI or the GUI). The entire stack of commands can be cancelled with the "Ctrl G" combined keyboard input from the Director window only. When using scripts, there is no stacking of commands since scripts wait for completion of each single command before proceeding with the next.
The GUI forms will update dynamically if a parameter is changed from the command line interface. Likewise, as soon as anything is changed in the form (and confirmed in case of important actions), the appropriate command will immediately be sent to the command line. For entry blank widgets, this occurs as soon as the blank loses ``focus'' when the mouse moves out of the window, or when the "Enter" key is pressed after entering the desired value.
All commands sent by the GUIs can also be directly entered at the CLI if one prefers command line control. Commands can also be sent through scripts (or a Unix prompt). The present document is based on the description of the GUI but the corresponding CLI commands or scripting commands (SC) are also described in detail. All CLI commands can also be used from a script by adding clicmd prior the normal command syntax (e.g. "clicmd go" for the go command). In addition, this document contains a section describing the commands available for building scripts.
4: System status
The three fields at the top of the main GUI window provide the name of the current exposure being taken, the file format and the current status of the camera. The filenames for the CFH12K FITS images include: the current CFHT odometer number (a unique 6 digit number) plus a one letter extension (o=Object, f=Flat, d=Dark, b=Bias, x=Focus). For example: 550076o
If the Multi-Extension FITS format is selected (FITS=MEF), a unique FITS
file is created with a ".fits" extension. If the MEF mode is off (FITS=SPLIT),
the 12 individual CCD images will be saved in independent standard FITS files
along with the primary header (converting to MEF mode is easy), in an
individual sub-Directory. A binned by 8 image of the full mosaic respecting
the relative output positions is created in both image format modes as
a normal independent FITS file (the structure of this file is independent
of the FITS file format selected). Its name is the root of the image name
with an added
See below "Selecting & converting image FITS file format" for more information on image format.
The right field in the GUI gives the current state of the camera, which can be: IDLE, CLEANING, CLEANED, EXPOSING, EXPOSED, READING, POWER OFF.
Note that since the odometer is accessed by all CFHT instruments, there is no guarantee you will get a sequential set of image numbers during your night as some other instruments might be running for setup and testing during the observing period (specially during daytime).
 |
5: Setting up FITS headers
The "OBSERVER", "OBJECT" and "COMMENT" FITS header fields can be changed for future exposure(s). The text will be truncated if it exceeds 70 characters. Note that some scripts (such as the dithering scripts) impose the "COMMENT" field but the "OBSERVER" and "OBJECT" fields are set by the observer or the scripts he built himself. Any character is allowed in these fields.
The command line interface syntax for this procedure is:
CLI= fits observer CFH12K aficionado
CLI= fits object NGC 3486 B band
CLI= fits comment This is the comment
The Principal Investigator name and Run Identifier must be entered
by the Support Astronomer at the beginning of the observing period based
on the information available in the
observing schedule. The semester must be appended to the Run
Identifier. It is coded with 3 digits: the last two numbers of
the year (01 for 2001), and the semester: A (Feb-Jul) or B (Aug-Jan)
CLI= header _piname CFHT
CLI= header _runid D0601A
6: Setting up and taking exposures
The GUI has a number of fields designed to accommodate the parameters for taking exposures.
Filter controls which
filter is in the beam
Filters available for CFH12K are:
B, V, R, I, Z, Halpha (Ha), HalphaOFF (HaOFF), TiO, CN. Only 4 filters
are available at once in the camera (4 position wheel). When a new
filter is selected, the system automatically moves the telescope
focus to the value for the new filter determined by the offset
between the foci for the new filter and the current filter.
To find out about the filters currently mounted in CFH12K, click on
the filter selection field: the filters appear from top to bottom
in the order of slot 0 to slot 3. The slot number is the first argument
of the command for use in CLI mode (0 to 3) and the filter name must
match the CFHT standard name: B, V, R, I, Z, Ha, HaOFF, TiO and CN.
Type the command "filter" with no argument to get a complete status
and help menu for this command.
CLI= filter 0 B
Here is the help message when the "filter" is entered with no argument:
The filters' characteristics are:
  CW = Central Wavelength (nm)
  CN = Cut on wavelength at 50% (nm)
  CF = Cut off wavelength at 50% (nm)
  T  = Transmission (%)
  BW = Bandwidth (nm)

  Broad band filters:                Narrow band filters:
  -----------------------------      -------------------------
  Name CW   CN    CF   T   BW        Name         CW   T   BW
  -----------------------------      -------------------------
  B    430  380  475   85  95        TiO          777  90  18
  V    550  501  595   90  94        CN	          812      16
  R    660  590  720   85  130       H-alpha      658  95  7
  I    830  725  930   80  205       H-alpha OFF  645  92  9
  Z    980  850  XXX   95  250       -------------------------
  -----------------------------
Raster defines the readout mode of the mosaic. Binned and subraster modes should be used only for quick-look purposes. Some built-in commands like flux, snap or a focus sequence will set up the raster as needed and will put back the initial set-up at the end of the exposure. CLI= raster full [full, full bin2, full bin4]
Exposure time controls the exposure time of the upcoming exposure(s). Exposure time can be entered either in seconds (i.e. 720) or in minutes with seconds (i.e. 12:00). When the "Bias" exposure type is selected, the string "(NA)" is appended to the exposure time to emphasize the fact that the exposure time is not applicable in that case. CLI= etime 600
Exposure type sets the exposure type for upcoming exposure(s). Exposure type can be: Object (science exposure), Flat (flat-fields), Dark (long exposure, no shutter activity), Bias (straight readout of the camera, no shutter activity) and Focus (to be used only by the focus routine, the user does not need to set it himself). A meaningful icon corresponding to each exposure type follows the selection. CLI= etype o [o,f,d,b]
Iterations defines the number of identical exposures (with incremental filename) to be taken in a row when the go button is pressed. CLI=go 6
Taking exposures
Go: Start an exposure
Pressing this button starts an exposure or multiple identical
exposures (if the ``Iterations'' field is set to a value greater than 1)
with the settings displayed in the form.
CLI=go n (for "n" exposures)
Stop: Stop the current
exposure and save it to disk
Pressing this button stops the current exposure (and will break a sequence
of multiple identical exposures) and causes immediate readout. The actual
exposure time is updated in the file FITS header. A confirm window will
pop up to ask confirmation from the user to actually send the stop
command.
CLI= stop
Abort: Abort the current
exposure (file not saved)
Pressing this button stops the current exposure (and will break a sequence
of multiple identical exposures) and puts the camera in wait mode. The
user can still decide to readout the camera by entering the command
readout at the command line in the Director window. The post-abort
state is indicated by a "EXPOSED" status icon. To resume the automatic
cleaning mode, enter the command clean on the command line
(automatic cleaning mode is active by default).
CLI= abort
Default: Reset exposure
parameters to default values
Pressing this button causes the exposure type & raster to be set to
default values (Object and Full raster). It is very safe to use it
when one needs to quickly return to the normal observing setup.
CLI= defaults
Snap: Take a quicklook
binned 8x8 exposure
This function allows the user to take an exposure that won't be saved
to disk. It will set up the raster parameter and will restore the
initial setting afterward. It is very handy, for example, for field
recognition. The exposure will be taken with the other current exposure
parameters but with the raster, hence the user should select first a
lower exposure time.
CLI= snap
Flux exposure: Take a
sky level measurement exposure
This function will setup the raster parameter (and will restore the
initial setting afterward) to select a small central area of each CCD
and measure the flux levels of CCD08 and CCD04 and feed the values back
to the user. Beware that CCD04 has inverted saturation behavior
(wrap-around) and its value should be considered valid only when
CCD08 is clearly below the saturation limit (less then 40,000 ADUs).
CCD04 is a HiRho CCD (so are CCD03 and CCD05) and has a much higher
efficiency in the red. The level of CCD04 can be twice as high as
CCD08 in the R, I and Z filters.
This function is intended to be used prior an automatic twilight
flat-field sequence to monitor the evolution of the sky brightness
for the given exposure time. The file won't be saved to disk.
CLI= flux
Here is an example of the feedback from the flux command, notice the warning regarding CCD04:
  Displayed CCD 08 (200x200 pixels) [saturation above 65K ADUs]
  Sky level on CCD08 = 24734 ADUs (offset = 800 ADUs subtracted)
  Sky level on CCD04 = 31540 ADUs (offset = 540 ADUs subtracted)
  Trust CCD04 values ONLY when CCD08 is below 40,000 ADUs.
7: Taking twilight flat-fields automatically
Twilight flat-fields are a crucial part of the CFH12K data set. In the B and V bands they allow efficient flat-fielding without the need for night sky superflats. In the R, Z and I band, they are essential to remove the multiplicative component from the night sky data to derive the additive fringe patterns.
Twilight flat-fields can be easily acquired at dusk and dawn with the following tool; hence it is strongly advised to always take them even if the observer thinks he has enough of them. However, when cirrus are present in the sky, the twilight flat-fields don't work too well (but are far better than nothing).
The twilight flat-fields sequencer allows the user to efficiently acquire the maximum number of twilight flat-fields within a limited amount of time. As soon as the proper exposure time is determined by the user with the flux command for a given filter, the sequence can be started. Upon sky brightness evolution laws established for CFH12K for each of the different filters, the subsequent exposure times will be adjusted so that the flux level on all the images of the sequence will be uniform.
The CFH12K readout time is one minute (including pre-exposure setup, detector cleanup and full mosaic readout), the write to disk time is not included since it is a background task: a new exposure can be started while the previous is still being written to disk.
Note that the sky brightness evolution laws are for nautical twilight only (astronomical twilight is defined as the sun being 18 degrees below the horizon, nautical twilight as the sun being 12 degrees below the horizon). The total duration of twilight varies slightly from summer to winter but remains very close to 81 minutes (start/end of astronomical twilights time to sunrise/sunset time). To find out when to start the twilight flat-field sequence, refer to the sky calendar at the following address for the current day of observation: http://www.cfht.hawaii.edu/Temporal/SkyCalendars/ and find the fields "twi. end" and "twi. beg" in the Sun columns.
It is possible to take exposures through various filters for about 30 minutes, hence with a 25-minute brightness limit from start of nautical twilight, this sets a 55 minute limit from the astronomical twilight to start/stop acquiring flat-fields.
At dusk:
-> subtract 55 minutes from "twi. end" in the sky calendar
to find the time where you can start acquiring twilight flat-fields
(sky still pretty bright, good for the narrow band filters, Z & I filters).
-> subtract 25 minutes from "twi. end" to find the time where you should
stop acquiring twilight flat-fields (the brightness law changes slope
then and the sky is "dark"). It is then time to go to the field of
interest and start a focus sequence.
At dawn:
-> add 25 minutes to "twi. beg" to find the time where you can start
acquiring twilight flat-fields (sky still pretty dark, good for the
B & V filters).
-> add 55 minutes to "twi. beg" to find the time where you should stop
acquiring twilight flat-fields (the sky is too bright).
Example: September 20, 2000:
"twi. end"=19:33 -> start flat-fields at 18:38 and stop them at 19:08.
"twi. beg"=04:57 -> start flat-fields at 05:22 and stop them at 05:52.
If the reported sky flux in the image does not seem appropriate, the observer can break the sequence and restart it with a revised exposure time.
Note that you can conduct scientific observations without much impact for 20 minutes before the end of astronomical twilight at dusk, and after the beginning of astronomical twilight at dawn as listed in the Sky Calendar table. This still leaves, for example, about 5 minutes to return the telescope to zenith and be ready for the dawn twilight flat-fields.
The exposure time in the sequence will increase during dusk flat-fields, and decrease during dawn flat-fields. At the end of the sequence, the user can pick a new filter if the the sky is not yet too dark or too bright and start again by adjusting the initial exposure time first with the flux function. Since the daytime and early twilight sky is darker towards the red wavelengths, always start at dusk with longer wavelength filters (i.e. Z, I, R in that order) and continue with shorter wavelength filters (i.e. V, B in that order) and vice-versa at dawn (B, V then R, I, Z in that order). The narrow band filter twilight flat-fields (Ha, HaOFF, TiO, CN) should be taken when the sky is very bright (still, the sun has to be below the horizon since CFH12K on CFHT is very sensitive). It is possible to take up to 7 exposures for each of two filters at either dusk or dawn.
A measurement of the sky level on CCD08 and CCD04 (check the
flux command description for the rationale
on using these two CCDs) is made on each single exposure and provides a
direct feedback to the user as the sequence evolves. Checking these
values, the observer can decide to break and restart the sequence
with a new exposure time if the model does not fit anymore with
the current sky brightness evolution. The feedback on the
Director window is:
  Sky level on CCD08 =  9714 ADUs (offset = 800 ADUs subtracted)
  Sky level on CCD04 = 11104 ADUs (offset = 540 ADUs subtracted)
For the bands I & Z where the night sky will produce interference patterns on the CCDs (fringes), it is crucial to take twilight flat-fields when the sky is still very bright such that the contribution from the OH lines (which cause the fringing) is still largely dominated by the twilight sky continuum.
Typical flat-field flux levels suitable for the different filters are: B=5,000 ADUs, V=10,000 ADUs, R=15,000 ADUs, I=20,000 ADUs. The CFH12K detectors are linear to within 1% up to 55,000 ADUs. Exposure times less than 2 seconds are not advised because the shutter ballistic could affect the large scale structures of the flat-field. Read the important note in the flux command description regarding the large discrepancies in the sky level depending which CCD is looked at.
In the early phase of dawn twilights, the flux command is not appropriate since the exposure time would be too long. It is advised to refer to the time the flat-fields were taken at dusk after the Sun set and tune an exposure time in a symmetrical way vs. the time the Sun will rise. For example, if the Sun set at 6:20PM and you took a 120 seconds V frame at 6:50PM, you can predict that with a Sun rising at 6:00AM, you can take a 120 seconds exposure at 5:30 AM. After the very first exposure, you have information on the sky level of that exposure and you can then abort or break the sequence if needed to tune the exposure time up or down.
Example of tf12k with real data taken on the night of the 28th of December 2000: The sun set at 18:02, twilight ended at 19:11, started at 5:37 and the sun rose at 6:46. The following sequence in B was started at 18:28 (after an R sequence started at 18:14): it shows how tf12k scaled the exposure time both at dusk and dawn. The right column gives the flux on CCD08 in ADU. The first dawn flat-field was taken at 6:08, 40 minutes before the sun rose, to match the flux from the last dusk exposure taken at 18:41, 40 minutes after the sun had set.
  ------------------------------------------
  Date		       Exp.Time        CCD08
  ------------------------------------------
  DUSK
  Dec 28 18:28:32 2000    14.0    	4303
  Dec 28 18:30:17 2000    19.0    	4320
  Dec 28 18:32:06 2000    26.0    	4130
  Dec 28 18:33:53 2000    36.0    	3983
  Dec 28 18:35:56 2000    51.0    	3950
  Dec 28 18:38:25 2000    77.0    	3917
  Dec 28 18:41:44 2000   129.0    	3869
  ------------------------------------------
  DAWN
  Dec 29 06:08:53 2000   140.0    	4303
  Dec 29 06:11:25 2000    82.0    	4397
  Dec 29 06:13:28 2000    54.0    	4431
  Dec 29 06:15:19 2000    38.0    	4540
  Dec 29 06:16:56 2000    27.0    	4442
  Dec 29 06:18:33 2000    20.0    	4513
  Dec 29 06:20:10 2000    15.0    	4623
  ------------------------------------------
After taking a sequence in a filter and moving to another filter, a rule of thumb is to start the sequence with the exposure time of the last exposure taken with the previous filter. This usually gives a good match of flux ratio with the recommended values for the various filters (as long as your last exposure was properly exposed, otherwise the flux ought to be used.
There are different ways one can run the telescope when taking twilight flat-fields: leaving the telescope parked at zenith presents the disadvantage that numerous stripes due to drifting objects will be present along the X axis of the mosaic, making it harder to analyze the sky background. If the telescope tracks, one will get the objects at the same place on the different exposures. The solution is to have the telescope tracking and having the telescope return to zenith between each exposure during the readout, hence the field is different in each exposure. The twilight flat-fields sequencer has been programmed to automatically execute the slew back to zenith. When the sequence begins, a confirmation window will appear and ask you to remind the Observing Assistant to allow these slews.
To keep the contribution from the objects in the field low, the z focus must be set to a value close to the nominal value for that particular filter. Large doughnuts due to bad focusing are harder to erase when combining the frames.
Telescope activities (slews, z focus change) do not impact the
camera readout, i.e. the signal is not affected. The
flat-field sequence parameters are: the initial exposure time,
the number of exposures to take during the sequence, and the
filter. The system automatically determines if this is a "dusk"
or "dawn" twilight sequence. A "Start sequence" button controls
the sequence execution.
CLI= tf12k 13 7 auto B
This tool only works for the B, V, R, I and Ha filters so far.
To run the sequence from the GUI:
8: Focusing
Why focusing is so important: look at the results from the CFH12K exposure time calculator (DIET, http://www.cfht.hawaii.edu/Instruments/Imaging/CFH12K/DIET/CFH12K-DIET.html):
   CFH12K filter: V       Sky = DARK             Beta = 3.5
   Type:  Point Source    SNR = 7.0              SNR aperture: Optimal
   Mag. = 25.0            Transparency: 100%
   Airmass = 1.0          Binning: 1x1 pixel
   -----------------
   Seeing  Etime
    0.5"    356
    0.6"    503		(+40% vs. 0.5")
    0.7"    677		(+35% vs. 0.6")
    0.8"    880		(+30% vs. 0.7")
    0.9"   1103		(+25% vs. 0.8")
Poor focus is equivalent to a seeing degradation in the sense that the
signal will be spread over more pixels, leading to a degradation of the
signal to noise ratio (SNR). The worse the focus, the more the exposure
time needs to be increased to achieve the required signal to noise ratio
(cf. DIET table above), hence it is a waste of telescope time. But while
the seeing only spreads light randomly around the centroid, hence
preserving the shape of the point spread function (PSF), a slight
defocus will introduce optical effects: an elongation of the PSF.
Missing the good focus position in typical seeing conditions (0.7") by
0.1 mm results in an image degradation of 0.1" (elongation of the PSF
along the major axis, the minor axis staying close to its optimal value).
Therefore, missing the right focus position by a 0.1 mm (which is typical
when proper attention has not be given to the focus in the course of the
night) means that the exposure time needed to achieve the proper signal
to noise ratio on the object is higher by up to 20% compared to the
exposure time at the best focus position (the degradation in SNR is
not as bad as seeing degradation since the flux is spread on a lower
surface).
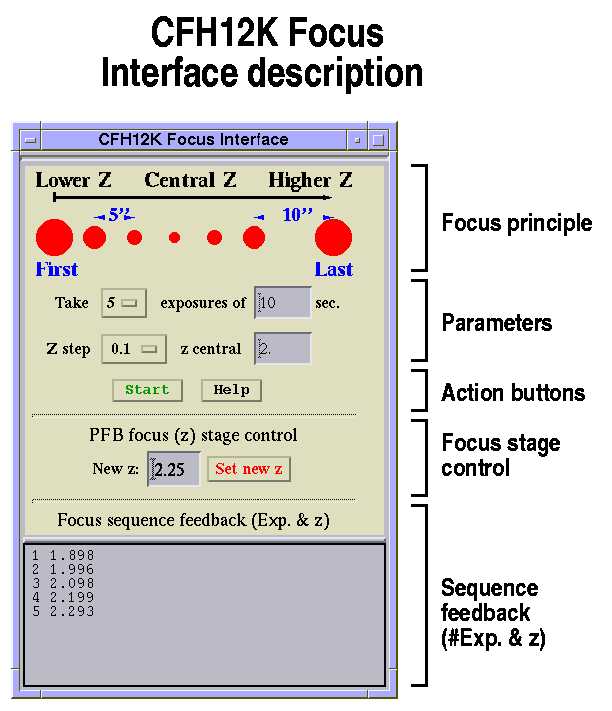 |
The CFH12K Focus Interface form provides an interface to focus the camera. The sequence consists in taking a set of exposures at different prime focus bonnette z (vertical axis) values and offsetting the telescope between each one. At the end of the sequence, the camera is read out (only the top half of each CCD is read, i.e. the area closer to the center of the field). This is done in multi-exposure mode where the shutter opens several times on a single frame. To differentiate the first from the last exposure, a double offset (10" vs. 5") is applied for the last exposure (this is illustrated at the top of the form). Depending on which CCD you look at, the last exposure might be up or down (top for CCD[00,01,02,03,04,05], bottom for CCD[06,07,08,09,10,11]).
The parameters defining the focus sequence are the number of exposures
to be taken at a given exposure time (defined in
the window, 10 seconds is a minimum to
ensure that the PSF is uniformly convolved by the seeing), the central
z value around which the sequence will evolve and the step in z. Steps
of 0.2 are handy to define what the correct z value is about, steps of
0.1 are enough to define a precise focus for seeing higher than 0.8".
Steps of 0.05 are strongly recommended if seeing is better than 0.8".
In the course of the night, as focus changes with temperature and other
conditions, short sequences of five positions which can take less than
two minutes are of great benefit to ensure the best quality of your
data.
CLI= focus 15 1.6 7 0.1 (focus sequence)
For example, a sequence of five 15-second exposures around z=1.3 with 0.1 steps will take the exposures at z = 1.1, 1.2, 1.3, 1.4, 1.5. The sequence will always start with the lower z by first going a bit lower to avoid any hysteresis effect on the bonnette vertical motion. The Start button will start the sequence (asking for confirmation first), the Abort button on the main GUI will abort it (asking for confirmation first).
As the focus sequence runs, the actual z value set for each exposure will be displayed in the lower feedback window.
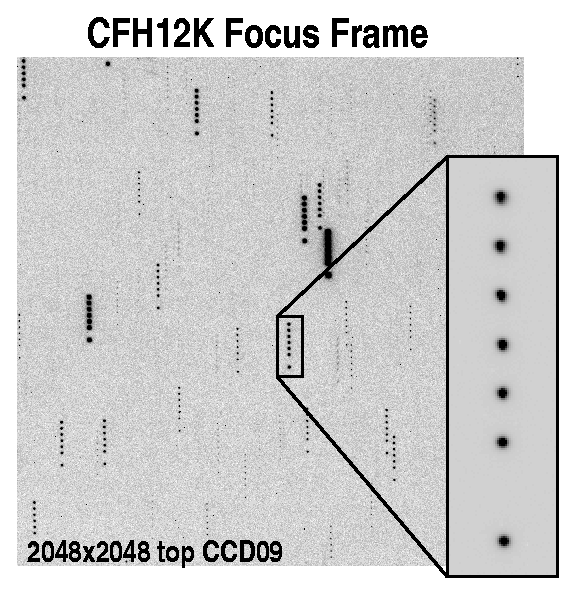
The focus file will be written to disk with a "x" extension (refer to the main window for the current filename). Make sure you are looking at a star and not a compact distant galaxy. Also make sure you are not using a saturated star or one close to saturation: don't select one with a peak intensity above 40,000 ADUs to be conservative. It is safe to analyze several stars across the image. The file can be analyzed with various tools:
The best z value can be entered in the focus interface. This value
is sent to the telescope control system with the Set new z
button (a confirm window will pop up). When moving to a new z
position, the bonnette will always go to a lower z first before
going to the selected value to avoid any hysteresis effect on the
bonnette vertical motion.
CLI= pfocus 2.3 (set z value)
Some information is provided when the pfocus command is entered
with no argument:
 |
Here is the set of z values for each filter at a given temperature of the dome (+3 deg. C) and the primary mirror focus set at 6110 units, a typical value set by the telescope operator at the beginning of each new CFH12K setup (once a month typically) when he focuses the guiding camera.
These values will change as the dome temperature changes: 1) when the temperature drops, the telescope shrinks, and the z stage (focus) value has to be increased to keep the instrument in focus; 2) when the temperature rises, the telescope expands, and the z stage (focus) value has to be decreased to keep the instrument in focus. The following table is only a (good) starting point, the actual value may be off by +/- 0.4 units (mm): the dome temperature can range from -5 to +5 deg. C, though normally stable to within 1 or 2 degrees in the course of a night. Models show that the telescope length (the trusses) will expand/contract by 0.08 mm for every degree Celcius change.
    ------------------------------------------------------------------------
   | Filter |  B   |  V   |  R   |  I   |  Z   |  Ha  | HaOFF | TiO  |  CN  |
   | z (mm) | 4.50 | 1.75 | 1.60 | 3.35 | 2.60 | 2.10 | 2.20  | 2.15 | 2.60 |
    ------------------------------------------------------------------------
The relative offset between the filters is independent of temperature and once the z value for a given filter is set properly, the automatic focus offset upon changing filters (cf. table below) should provide a good focus. However, it is highly recommended to focus the camera when a new filter is selected and and when you've noticed a slight degradation of the image quality on the last exposures. An automatic focus adjustment during the night to compensate for the variable temperature will be implemented soon.
However, mechanical flexures dominate focus changes when the telescope is significantly moved between two pointings. Refocusing is strongly advised after large telescope moves (more than 40 degrees).
   --------------------------------------------------------
   |From\To|   B   |   V   |   R   |   I   |   Z   |   Ha  |
   --------------------------------------------------------
   |   B   |       | -2.75 | -2.90 | -1.15 | -1.90 | -2.40 |
   --------------------------------------------------------
   |   V   | +2.75 |       | -0.15 | +1.60 | +0.85 | +0.35 |
   --------------------------------------------------------
   |   R   | +2.90 | +0.15 |       | +1.75 | +1.00 | +0.50 |
   --------------------------------------------------------
   |   I   | +1.15 | -1.60 | -1.75 |       | -0.75 | -1.25 |
   --------------------------------------------------------
   |   Z   | +1.90 | -0.85 | -1.00 | +0.75 |       | -0.50 |
   --------------------------------------------------------
   |   Ha  | +2.40 | -0.35 | -0.50 | +1.25 | +0.50 |       |
   --------------------------------------------------------
   Offsets for the B, V, R, I, Z, Ha filters (automatic focus
   also supports the less commonly used CN and TiO filters).

   Example: z being set at 4.3 optimal for the B filter when
            going to the V filter, the z will be automatically
            adjusted by: B->V=-2.75 -> new z=1.55
Also, when observing in a given filter, if image degradation is noticed in the course of a set of exposures, the focus can be adjusted by small amounts (0.05 steps) to get back to the optimal position. To determine which way to go (up or down), refer to the previous focus sequence in the filter being used and look at the orientation of the star image ellipse above and below the best focus position. This angle changes by 90 degrees, hence it is easy to notice. Make sure that you compare the data from a SAME CCD both on the focus AND the science exposures. Recall that the last focus exposure with the higher z has a double offset (towards higher z) which can be either at the bottom of the sequence on the screen or at the top depending on which CCD you look at (top for CCD[00,01,02,03,04,05], bottom for CCD[06,07,08,09,10,11]). For example, the best focus position was found to be the central position of a 5-position sequence. The 2 last exposures (with the higher z) show that the ellipse has a direct angle of 160 degrees (see also the illustration below for a different scenario). If the science exposure exhibits the same effect then the z focus must be reduced by 0.05 units (never do more than 0.1; if this seems to be the case, then it is better to restart a complete focus sequence). If you send the command from the CFH12K session, it won't be executed immediately: the other pending commands will be done first (like finishing the current exposure). As a consequence for this particular situation, you need to ask the Observing Assistant piloting the telescope to send a passthrough command to the prime focus bonnette. Ask for the new value you wish, then monitor the various status windows for the new z value. This can be done during an exposure (within the first minutes of the exposure otherwise it would be quite useless). Beware that you'll have to wait for the end of the following exposure to evaluate the effect of the correction: when working with short exposure times this is quite efficient but it can be dangerous when using long exposure times. In any case, it is crucial to evaluate the image quality of the first image produced after such change.
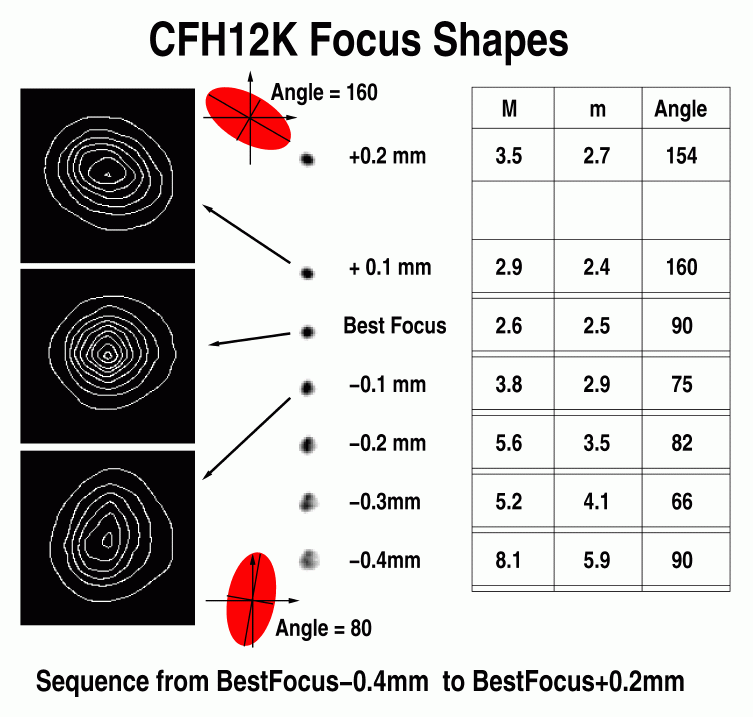 |
The "CFH12K Focus Shapes" figure shows the Point Spread Function (PSF) behavior around the optimal focus position. Notice the rapid image degradation beyond 0.2 mm of the optimal focus position. "M" is the FWHM along the major axis of the ellipse fitting the star, "m" is the FWHM along the minor axis of the ellipse fitting the star. "Angle" is the direct angle of the major axis of the ellipse fitting the star. Notice here that the best focus indicates a FWHM of 0.5 arcsecond (I-band)! Beware that under average seeing conditions, this "rotation" of the PSF is harder to detect since the effect is blurred within the seeing disk.
When taking standards in good seeing conditions, the observer may need to defocus the camera slightly such that the brightest photometric standards don't saturate on a 4-second exposure: adding a 0.2 step on the optimal value for the initial filter will do (adding more would push into the domain where the PSF starts to degrade dramatically). This offset will be then also present on the other filters. For example, if the focus is optimal at 3.30 in the I band and the seeing in 0.5", use the command pfocus (or the focus GUI) to set the z stage to 3.50. Take all your photometric standards exposures by just selecting the new filters: for all of them the focus will be off by +0.2 mm. After the sequence, reduce the focus by 0.2 mm to be sure you're back at the best focus for the science exposures.
9: Dithering patterns
Within the GUI, as well as on a command line, the observer can select a dithering pattern. The system will automatically take exposures and offset the telescope between each. For the seven choices made available on this form (there are actually up to 21 positions available with this "dp12k" command from the CLI and script modes) all exposures are within a disk of 15 arcseconds on the sky. This is sufficient to fill the gaps between the CCDs (about 6 arcseconds) and jump over the largest cosmetic defects. It ensures also that the wide-field corrector optical distortion won't affect the data such that they can be stacked together without ressampling.
Beyond the 15-arcsecond disk, in normal subarcsecond seeing conditions, the observer will be forced to re-sample his data to correct for the optical distortion before being able to stack them (not doing so would result in terrible image quality degradation across the field of view). Also with large offsets between exposures, some significant portions of the field will be covered by different CCDs: this is an issue when combining the data since the CCDs in the mosaic have slightly different color equations: it will affect the photometry of the objects.
When used as a CLI command (or from a script), a second and third argument to "dp12k" allows the user to start the sequence at any given position within the dithering pattern and take a given numbers of exposures from that starting point (up to the number of exposures selected for that dithering pattern). This is handy when a sequence has been aborted and needs to be restarted (after an imposed focus sequence for example), or if the sequence needs to be extended to ensure that the desired signal-to-noise ratio will be reached after the transmission monitor showed that there is some absorption due to some cirrus or that the seeing degraded in the course of the sequence. It could also happen that the sequence needs to be restarted because a single night of observing was not enough to cover that object. In that case (or more generally anytime after a slew of the telescope was executed) the telescope needs to be perfectly recentered on the initial position. The "snap" and "offset" commands are of great interest to properly go quickly through this procedure (the FITS scientific frame previously obtained on the initial position must be the reference, not its coordinates which are affected by some pointing errors). But proper respect of Telescope Control System coordinates (guiding box position, X&Y coordinated of the guide probe) should allow recentering within 2 arcseconds.
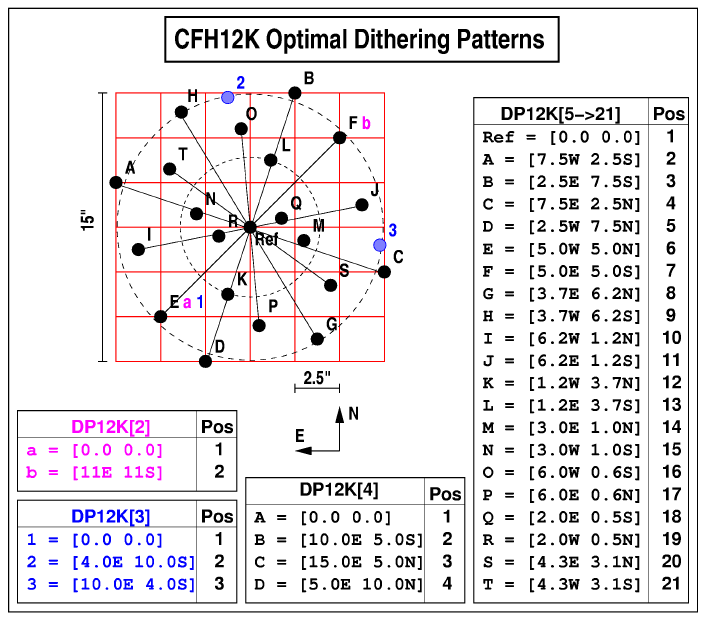 |
From 2 to 4 positions, the disk is not centered on the initial position: the first position of the pattern is the initial position of the telescope and lies on the 15" diameter circle (position label "a" for DP2, position label "1" for DP3, position label "A" for DP4). The telescope returns to the initial position at the end of the sequence. For 5 positions and up, the disk is centered on the initial position of the telescope (position label "Ref" for DP5-21) and the system returns the telescope to that central position at the end of the sequence.
The dp12k script (/h/cfh12k/scripts/dp12k) can also be used as a
reference by the observer to build his own scripts (with larger offsets
for example if they are willing to ressample all their data to correct
for the geometrical distortion and cope with mixing their signal from
CCDs with different responses). Here is the help message for the
"dp12k" tool ("Ref" refers to the first exposure of the sequence =
the initial position of the telescope at the beginning of the
sequence):
       Execute a dithering pattern with the following offsets vs Ref:
       dp 2     = [Ref] [11E 11S]
       dp 3     = [Ref] [4.0E,10.0S] [10.0E,4.0S]
       dp 4     = [Ref] [10.0E,5.0S] [15.0E,5.0N] [5.0E,10.0N]
       dp 5->21 = [Ref] [7.5W,2.5S] [2.5E,7.5S] [7.5E,2.5N] [2.5W 7.5N]
                        [5.0W 5.0N] [5.0E 5.0S] [3.7E,6.2N] [3.7W,6.2S]
                        [6.2W,1.2N] [6.2E,1.2S] [1.2W,3.7N] [1.2E,3.7S]
		        [3.0E,1.0N] [3.0W,1.0S] [6.0W,0.6S] [6.0E,0.6N]
			[2.0E,0.5S] [2.0W,0.5N] [4.3E,3.1N] [4.3W,3.1S]
       Exposures stand within a disk of 15 arcseconds diameter.
       No exposure has a similar X and Y on the detector.
       Will enter offset values in FITS comment.
       Telescope is sent back to its initial position (Ref) at the end.
The different positions are optimized such that no exposure has a similar X and Y on the detector. Each "pushbutton" on the GUI has an associated graphical representation of the dither pattern to be executed (for more positions, "dp12k" needs to be launched at the CLI). A dithering pattern sequence can be stopped by clicking on Break (a confirm window will pop up first). The Stop and Abort functions are also active in this mode. These interupt functions are also active when "dp12k" is started from the CLI.
CLI= dp12k n [startpoint] [nexp]
n=[2,3,4,5,6,7,8,9,10,11,12,13,14,15,16,17,18,19,20,21]
startpoint: any value between 1 and n
nexp: 1 to [n - startpoint + 1]
  Example:
	o "dp12k 10"      : take 10 dithered exposures - positions 1 to 10.
	o "dp12k 13 6"    : take  7 (13-6)  dithered exposures - positions 6 to 13.
	o "dp12k 21 15 3" : take  3 dithered exposures - positions 15 to 17
10: Small telescope offsets
The telescope can be offset in guiding mode from its current position using this tool. Enter the offset along the East-West and North-South axes in arcseconds and then click on the Offset Telescope button (a confirm window will pop up). Offsets can be as much as 400 arcseconds if the position of the guide star is fine (the guide probe has a limited field of free motion to avoid the vignetting of the CFH12K mosaic and the Observing Assistant should alert you if you've lost the guide star). This command along with the snap command is handy when centering the field on the camera.
CLI= offset -10 4
11: Selecting & converting image FITS file format
"FITS file format" Split/MEF FITS format selection
Open the FITS file format selection window. If the Multi-Extension FITS format is selected (FITS=MEF), for each image a unique FITS file is created with a ".fits" extension. If the MEF mode is off (FITS=SPLIT), the 12 individual CCDs will be saved in independent standard FITS files along with the primary header in an individual subdirectory. In the main image directory, there will also be a binned by 8 image of the entire mosaic.
Note that as shown in the drawing, the name of the CCDs does not match the extension name in the MEF file. Refer to the map on this page when looking at a particular detector within the mosaic.
The binned by 8 image has a "-B8.fits" extension. This binned image
organizes the CCDs as shown on the drawing with the North towards
the bottom and the East towards the right [Reminder: the CFH12K
camera can not be rotated]. The relative geometry of the mosaic
readout outputs is taken into account so that the image represents the
observed field properly. World coordinates are set up correctly to allow
the observer to travel in the CFH12K field and locate his objects of
interest. Note that the binned resolution is very low
(1.6 arcseconds/pixels!) and small objects won't be visible, but this
quick-look is intended to be a tool for field recognition, centering,
and checking. The high binning factor has the great advantage of
enhancing the faint large scale features that would be invisible
on the non-binned image. Use this image to detect any contamination
problem (nearby bright star light scattering, vignetting by the guide
probe, etc.). The binned by 8 image is automatically displayed
at the end of each new exposure (that image is named current.fits).
In MEF mode, the ls command would show the following Directory contents:
  495401b.fits  495401b-B8.fits 495402b.fits  495402o-B8.fits
  495403b.fits  495403b-B8.fits 495699b.fits  495699b-B8.fits
  495700o.fits  495700o-B8.fits
In SPLIT mode, the result would have been:
  495401b/            495402b/           495403b/
  495401b-B8.fits     495402o-B8.fits    495403b-B8.fits
  495699b/            495700o/
  495699b-B8.fits     495700o-B8.fits
With each image Directory containing 12 FITS file and the primary header:
  495700o.phu     495700o04.fits  495700o09.fits
  495700o00.fits  495700o05.fits  495700o10.fits
  495700o01.fits  495700o06.fits  495700o11.fits
  495700o02.fits  495700o07.fits
  495700o03.fits  495700o08.fits
It is easy to go from one format to another with the use of the split2mef and mef2split scripts. For example:
SPLIT to MEF: split2mef 495401b -> will create 495401b.fits (it will not remove the Directory 495401b and files in it though).
MEF to SPLIT: mef2split 495401b -> will create the subDirectory 495401b with all the files inside (it will not remove the file 495401b.fits).
You can also convert a whole set of images at once. They need first to be organized in a single sub-directory: use splits2mef and mefs2split scripts. For example:
SPLIT to MEF: splits2mef /h/cfh12k/images/Night161200 -> will create MEF files from all the SPLIT files found in the Night161200 directory (it will not remove the initial files though so beware of the disk space used!).
MEF to SPLIT: mefs2split /h/cfh12k/images/Night161200 -> will create the SPLIT images from all the MEF files in the Night161200 directory (it will not remove the initial files though so beware of the disk space used!).
12: Complete set of commands for the command line interface & scripts
Scripts can be executed from any window opened on the session host Xterm or Rxvt on mahina, or from the Director window using the "!" character prior the script name. They can be as simple as the following examples or more complex as some of the scripts that can be found in the "/h/cfh12k/scripts" directory. Scripts can call other scripts. The user should build his own scripts in a Directory separate from the "/h/cfh12k/bin" directory to avoid confusion (in the existing directory "/h/cfh12k/scripts" for example). In the following examples, the scripts can be executed from the Unix prompt with the following command:
WARNING: if you want to abort a script, first interrupt it with
Ctrl C in its running window and then abort the
exposure if necessary. Never abort an exposure before killing
the script, it will confuse the system (use either the
GUI
or the
CLI interface
to send the break, stop, or
abort command).
Scripts can combine the following commands: (commands "flux", "snap", "tf12k", "focus", "mef" are not appropriate for use within a script of course)
Example 1:
Setup templates and launch the dithering pattern script with 8 positions
  #
  climcd etype o
  clicmd etime 600
  clicmd raster full
  clicmd fits observer CFH12K aficionado
  clicmd fits object NGC 3486
  dp12k 8
Example 2:
  #
  climcd etype o
  clicmd etime 10
  clicmd fits object SA110
  clicmd filter 0 B
  clicmd fits comment B filter - 10 seconds
  clicmd go 1
  clicmd filter 1 V
  clicmd fits comment V filter - 10 seconds
  clicmd go 1
  clicmd filter 2 R
  clicmd fits comment R filter - 10 seconds
  clicmd go 1
  clicmd filter 3 I
  clicmd fits comment I filter - 10 seconds
  clicmd go 1
Example 3:
  #
  clicmd fits comment Ref position
  clicmd go
  offset 10 4
  clicmd fits comment Ref position + [10"E + 4"N]
  clicmd go
  offset -20 6
  clicmd fits comment Ref position + [10"W + 10"N]
  clicmd go
13: The engineering form
WARNING: do not use
the engineering form if you are not a member of the CFHT staff!
 Comments on the CFH12K pages to Jean-Charles Cuillandre:
jcc@cfht.hawaii.edu
CFH12K
is the CFHT CCD wide-field
imaging mosaic.
Comments on the CFH12K pages to Jean-Charles Cuillandre:
jcc@cfht.hawaii.edu
CFH12K
is the CFHT CCD wide-field
imaging mosaic.