
|
A bit more progress in 2007! Of course, the Ninole project is always slowed down a bit by work, business travel (Marseille in May), conferences (Kingston, Ontario, in June), week-ends where we have to work, a few days off to relax a bit, or visits to family (a nephew's baptism and visiting both sets of in-laws in June). Let's not forget either the little catastrophe of the summer: because of the drought, some hyper dry grass that had accumulated in some corner of the Cub Cadet caught on fire, more than 1 hour after everybody had left the property! The gas tank of the Cub Cadet was full and probably exploded in one big boum. But we were lucky: only about one quarter of the greenhouse was damaged (melted plastic, back wall burned down, ground cover melted), the Cub Cadet was a total loss, but the Craftsman riding mower was spared (le fill tube for the gas tank had started to form a bubble). But more has happened in 2007 than in 2006: the magnificent wood railing is done, the laminate flooring was installed in the living room, the pluming was roughed-in, the structure of the exterior deck was completed, the Power Shed was started and finished, all that with a little wedding mixed in on July 31. |
Un peu plus de progrès en 2007! Bien sûr, il y a toujours le boulot, les voyages d'affaire (Marseille en mai), les conférences (Kingston, Ontario, en juin), les fins de semaine à travailler, quelques jours de vacances de temps de temps, les visites à la famille (le baptême d'un neveu et quelques jours chez les belles-familles en mai) qui ralentissent un peu les travaux à Ninole. Sans oublier la petite catastrophe de l'été: à cause de la sécheresse, du gazon hyper sec coincé dans le Cub Cadet a pris en feu, plus d'une heure après que tout le monde ait quitté les lieux! Le réservoir du Cub Cadet était plein et a probablement explosé d'un seul coup. Mais on a été chanceux: seulement un quart environ de la serre a été endommagé (plastique fondu, mur de bois brûlé, recouvrement de sol fondu), Cub Cadet perte totale, mais le tracteur de jardin Craftsman a été épargné de justesse (le tube près du bouchon du réservoir d'essence commençait tout juste à former une bulle de plastique chauffé!). Mais 2007 a vu plus de progrès que 2006: magnifique rampe d'escalier intérieure terminée, plancher laminé installé dans le salon, plomberie "brute" terminée, structure de la galerie extérieure terminée, cabanon-énergie commencé et complètement terminé, avec un p'tit mariage le 31 juillet entre-temps. |


| |
|
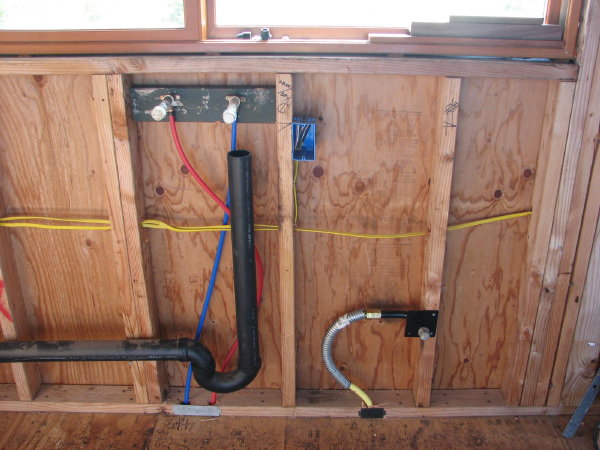
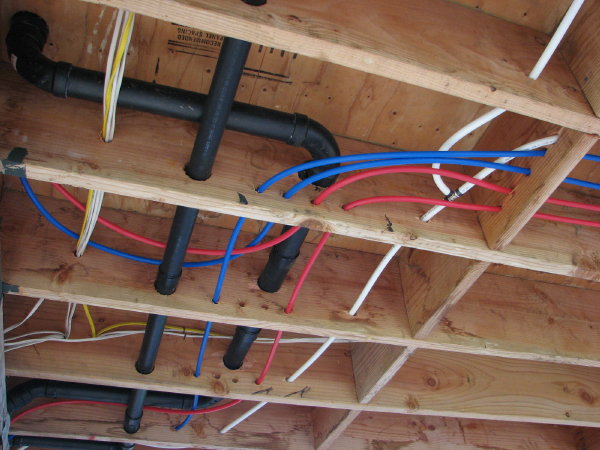
Plumbing Almost exactly a year after the plumber had started his work in March 2006 with the drainage part, a bit more work was done, in March 2007, on the supply lines and the drainage to the cesspool this time. There were only a few more days of work needed before we could call for the rough-in inspection. Only a few days... a bit more time... a small push... not much... should be easy, yes? NO! One month goes by, then another, and another, without news from the plumber. Jeff decided then to try to finish the work himself, but with the supervision of the Power Shed and deck construction, that was just too much to ask. Luck was with us on Thanksgiving day, during a neighborhood party. Telling our story of the plumber who would not show up caught the attention and compassion of some friends, who recommended another plumber, good and efficient. After that, everything sped up tenfold! The plumber called us on November 27, the first plumber's permit was cancelled on the 28th, we met this new plumber on the 28, 29 and 30th to discuss our needs and what his services were, and the contract was signed on November 30! With a change of the plumbing code just the month previous (!), we were just lucky to find a competent worker who was available right then. We had to wait just a little bit for the new plumbing permit, but right after that, work started, on December 21, and was completed by the 27th! On January 2, 2008, the plumbing inspector passed us! What a relief! The drainage (for the toilet for example) is made up of the standard black and rigid pipes. The supply part uses flexible pipes (blue or white for the cold water and red for the hot water, in general) directly connecting each faucet to the manifold which distributes the water throughout the house. There are more pipes to install, but since they are flexible, the work goes very quickly. The main advantage to the flexible pipe system is that hot water gets to each faucet very quickly because the hot water comes directly from the hot water heater, without having to pass by other faucets first. The plumbong also includes gaz lines (liquid propane for the hot water heater, the stove, and the clothes dryer). The pictures below show the supply lines and drainage for the washer, and the gas supply line for the dryer, and the installation for the bathroom lavatory. |
Plomberie Presqu'exactement un an après que les travaux de plomberie aient été commencé en mars 2006 avec le drainage, un peu de progrès a été accompli en mars 2007, pour les tuyaux d'alimentation et le drain vers la fosse septique. Il ne restait que quelques jours de plus pour terminer la phase de plomberie "brute", qui devait être inspectée avant de pouvoir continuer la finition intérieure. Que quelques jours, juste un peu plus de temps, pas beaucoup, devrait pas être difficile à terminer, non? Si! Un mois, deux mois, trois mois passent, sans nouvelles du plombier. Jeff décide alors d'essayer de terminer lui-même les travaux, mais avec la supervision de la construction du cabanon-énergie et de la galerie, la concentration nécessaire pour terminer la plomberie n'y était pas! Par chance, lors d'un party de la Thanksgiving (en novembre), notre histoire de plombier trop occupé a attiré l'attention d'amis, qui nous ont recommandé un bon plombier efficace et méticuleux. Après ça, tout s'est passé à la vitesse de l'éclair (tout étant relatif): le plombier a appelé le 27 novembre, le permis du premier plombier a été annulé le 28, on a rencontré le nouveau plombier à Ninole les 28, 29 et 30 novembre pour discuter de nos besoins et des services qu'il offrait, et le contrat a été signé le 30! Avec le code de plomberie qui venait tout juste de changer (en octobre!), on s'est trouvé chanceux d'avoir quelqu'un de compétent et disponible. Il a fallu attendre un peu avant d'obtenir le nouveau permis, mais après, les travaux ont commencé le 21 décembre et ont été terminé le 27! Et le 8 janvier 2008, l'inspecteur est passé et a approuvé les travaux! Quel soulagement! Le drainage est standard, avec les tuyaux noirs rigides pour évacuer les eaux usées (de la toilette par exemple). Le système d'alimentation est fait de tuyaux flexibles (bleus ou blancs pour l'eau froide, rouge pour l'eau chaude, en général) reliant directement chaque robinet au système central de distribution. Il y a beaucoup plus de tuyaux à installer, mais puisqu'ils sont flexibles, ça va très vite. L'avantage majeur est que l'eau chaude arrive plus rapidement puisqu'elle arrive directement du chauffe-eau sans passer par plusieurs autres robinets. La plomberie inclue également le gaz (propane liquide pour le chauffe-eau, la sécheuse et la cuisinière). Les photos ci-dessous montrent (à gauche) l'alimentation pour la laveuse ainsi que son drain, et l'arrivée du gaz pour la sécheuse, et (à droite) l'installation pour l'évier de la salle de bain. |

| |
|
Staircase and railing At the end of 2006, we had had the work started for the inside staircase and loft railing. The idea was that if we wanted to camp out in the house and sleep in the loft, we had to have railings to avoid falling down one floor in the middle of the night! We never got to camping in the loft, but it was a good excuse to start the work. The conceptual issue is that the staircase makes a 30 degree angle between the two flights of steps. A design based on square posts would just not work at all! It took one visit by a genius carpenter to find THE solution: use hexagons! We first had to install the flooring in the staircase for the steps and landing, and then might as well do the whole installation (using glue) for the living room. The product we had bought quite a while ago is a laminate flooring with a maple pattern and traces of pink that blend very well with the cherry-stained rafters of the ceiling. Fabricating the railing for the staircase and loft took a while because of all those hexagons to cut and place correctly. But what a gorgeous result! Made mostly of ohia wood with a few koa pieces, the railing is a very elegant part of the staircase. The whole assembly is very sturdy and very safe, and also a pleasure to look at. |
Balustrade Fin 2006, on avait également fait commencer la rampe d'escalier à l'intérieur. L'idée était que si on voulait camper dans la maison et dormir dans le loft, il fallait absolument avoir la rampe d'escalier et la balustrade pour éviter quelque malencontreuse chute vers l'étage d'en-dessous! Cette idée géniale ne s'est jamais concrétisée (on n'a pas campé dans le loft), mais c'était une bonne excuse pour commencer ces travaux. La difficulté conceptuelle est que l'escalier fait un angle de 30 degrés entre les 2 volées de marches. Un design basé sur des balustres et poteaux de coin carrés manquerait tout à fait d'élégance. Il a fallu la visite d'un ébéniste de génie pour trouver LA solution: faire des hexagones partout! Il a fallu tout d'abord recouvrir les marches de l'escalier avec le plancher laminé acheté auparavant, et tant qu'à faire, finir son installation (avec de la colle) dans le salon. Le produit acheté imite l'érable et offre quelques traces de rosé qui se joignent agréablement au bois teint couleur cerisier au plafond. La fabrication de la rampe d'escalier et de la balustrade du loft ont pris pas mal de temps, justement à cause de tous ces hexagones à scier et placer correctement. Mais quel résultat magnifique! Faites en majeure partie de ohia avec quelques pièces en koa, la rampe et la balustrade s'intègrent gracieusement à l'escalier. Le tout est très solide et très sécuritaire, élégant et raffiné, un plaisir pour l'oeil. |
|
| |
|
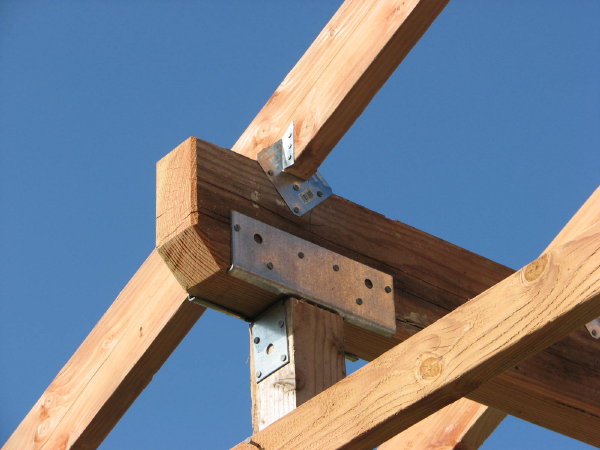
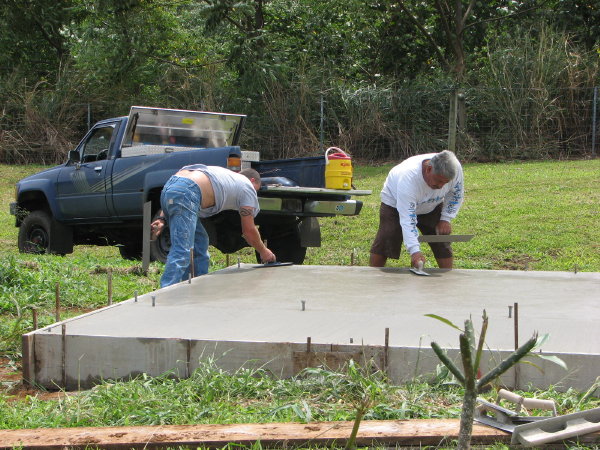
Power Shed Also at the end of 2006, a bulldozer had prepared the pad for the Power Shed, between the house and the gulch. The construction was then very similar to the house's construction: concrete forms preparation with the gravel, plastic and rebars, inspection, concrete pour, construction phase for theframing and roofing, plywood, siding, painting, and final inspection (passed on Jan 14, 2008). It had been a while since the house had been built, and the carpenters had forgotten a bit of their trade... they forgot to put the framing for the door of the shed! And then the opening was too big, and it's only on the 3rd try that they finally got it right... The final result is very pretty, with the siding and colors matching those of the house. |
Cabanon-énergie A la fin de 2006 également , un bulldozer avait dégagé mis à niveau l'emplacement pour le Cabanon-Energie, situé entre le ravin et la maison. Sa construction rappelle celle de la maison: préparation des formes avec le gravier, le plastique et les barres de métal pour le coulage du béton, inspection, coulage du béton, construction de la charpente, pose du contre-plaqué, du revêtement extérieur et du toit, peinture, puis inspection finale (passée le 14 janvier 2008). Après la construction de la maison, les menuisiers avaient un peu oublié comment construire... ils ont oublié de faire l'ouverture pour la porte! Et puis l' ouverture pratiquée était trop grande, et ce n'est que le 3e essai qui fut le bon... Le résultat final est très joli, puisque le revêtement et les couleurs sont ceux de la maison elle-même. |


| |
|
Deck During the Fall of 2007, it was time for the outside deck. Some more concrete to pour for the foundation, some more framing and hangers, some priming and painting, with the same color as the house's roof. For the decking material, we initially wanted to by some composite material made of plastic and wood fibers. Despite what the local provider had told us, we were only able to find and purchase 4 planks! So we decided to forget the local market and go for a company that can ships anything from anywhere on the mainland. For just a bit more money than the composite material, we found a marvelous exotic wood, ipe. This wood is so dense that it sinks in water, and has a fire rating as high as concrete! Besides its durability, it's a wood without knots but fine grain, very durable, and insect-resistant. Once oiled, it looks just gorgeous, with warm tones of brown and deep red. |
Galerie Au cours de l'automne 2007, ce fut au tour de la galerie extérieure de prendre forme. Encore du béton à couler pour les fondations, puis le squelette de bois et ses ancres de métal, la couche de fond, et les couches de peinture, de la même couleur que le toit. Pour la surface de la galerie, on avait pensé au début utiliser des planches faites d'un matériau composite (plastique et de fibres de bois). Malgré les promesses du fournisseur local, tout ce qu'on a pu trouver et acheter, c'est 4 planches! On s'est alors rabattu sur une compagnie qui fait tout venir du continent, et qui pouvait nous trouver un bois exotique idéal, le ipe, pour juste un peu plus cher que le bois composite. Très dense (le bois coule dans l'eau!), sans noeuds et au grain fin, solide et durable, il est résistant aux termites et au feu (il est classé avec le béton!). Une fois huilé, le bois est tout simplement magnifique, avec de riches tons de brun et de rouge. |

| |